U-BLOX NINA B302 E ETHERNET 802.3 COM ALEXA
MÉTODO RÁPIDO VIA SINRIC PRO
O objetivo deste BLOG é demonstrar como é possível utilizar o ARDUINO para programar o módulo U-BLOX NINA B302 para ter acesso a INTERNET via 802.3, por meio do módulo ENC28J60. Foi utilizado o BREAKOUT NINA B302 para o teste. Uma vez conectado na Internet, poderá receber comandos enviados pelo ASSISTENTE ALEXA VIA SKILL SINRIC PRO
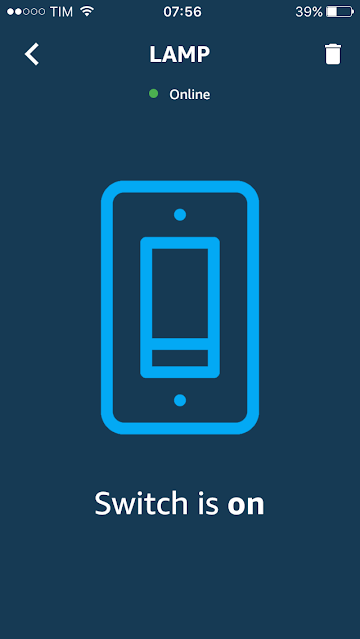
Turn On Device e Turn Off Devices são uma das palavras chaves para a assistente Alexa. Ao falar estes comandos um Relê será Ligado e Desligado
SMARTCORE
A SmartCore fornece módulos para comunição wireless, biometria, conectividade, rastreamento e automação.
Nosso portifólio inclui modem 2G/3G/4G/NB-IoT/Cat.M, satelital, módulos WiFi, Bluetooth, GNSS / GPS, Sigfox, LoRa, leitor de cartão, leitor QR code, mecanismo de impressão, mini-board PC, antena, pigtail, LCD, bateria, repetidor GPS e sensores.
Mais detalhes em www.smartcore.com.br
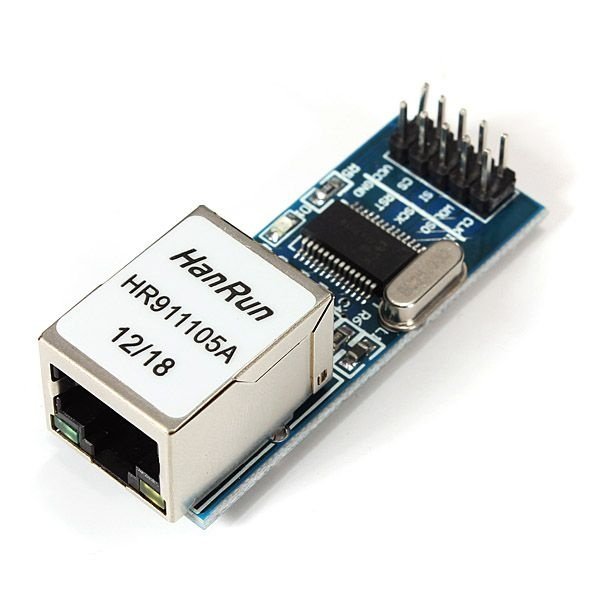
ENC28J60
O módulo Ethernet ENC28J60 utiliza o novo IC controlador controlador independente Microchip ENC28J60 com uma série de recursos para lidar com a maioria dos requisitos de protocolo de rede. A placa se conecta diretamente à maioria dos microcontroladores com uma interface SPI padrão com uma velocidade de transferência de até 20MHz.
SINRIC PRO
Com Sinric Pro, você pode conectar sua placa de desenvolvimento IOT com a Alexa através de uma Skill confiável
Vamos começar:
1. Acesse https://sinric.pro/pt-index.html
2. Crie uma conta gratuita e faça log in
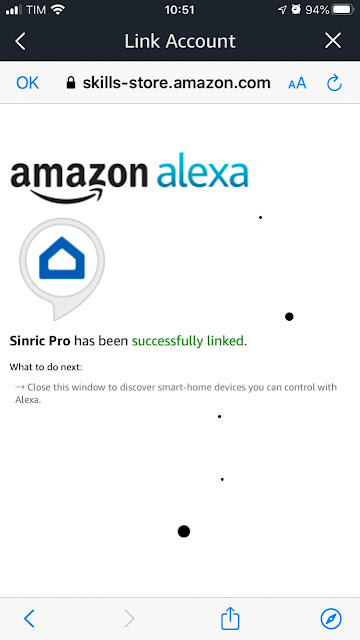
3. Pelo aplicativo da Alexa, ou pelo site, instale e ative a skill "Sinric"
4. Crie um novo dispositivo, como por exemplo uma TV. Anote o token de autorização, a chave de autenticação e o ID de se novo dispositivo.
5. O aplicativo da Alexa irá mostrar uma notificação informando que encontrou um novo dispositivo.
7. Carrego o exemplo abaixo em seu sketch
Altere o token, chave de autenticação e dados do WiFI com os seus próprios.
ASSISTENTE ALEXA
O Amazon Alexa é um serviço de voz na nuvem da Amazon que permite que os desenvolvedores controlem por voz os serviços da Amazon conectados. Um aplicativo exemplo é o Amazon Echo, que é um assistente de controle de voz. Quando os usuários falam com o Amazon Echo, ele analisa a voz recebida e faz uma resposta apropriada. Neste exemplo, apresenta-se como conectar os serviços da Amazon (incluindo o Amazon Alexa, o AWS Lambda, o AWS IoT Core, o AWS IAM).
O Amazon Alexa Skills Kit (ASK) é um serviço de voz. Ele pode ser conectado a serviços da nuvem e o usuário pode controlar por voz os serviços conectados e receber resposta de voz. O recurso de análise de voz fornecido pelo Amazon Alexa está pronto para uso, faz com que os desenvolvedores possam se concentrar no design do serviço em nuvem e no modelo de interação do usuário.
Instalando Arduino Adafruit no NINA B302
Abaixo o roteiro para você seguir:
Baixe e instale o Arduino IDE
Inicie o Arduino IDE, vá em Preferências e adicione
https://www.adafruit.com/package_adafruit_index.json
como "URL adicional do gerenciador de pastas"
Abra o Boards Manager no menu Tools -> Board e instale o "Adafruit nRF52 by Adafruit"
Selecione sua placa nRF5 no menu Ferramentas -> Placa
Adafruit Bluefruit nRF52 Feather
OBSERVAÇÃO: Durante a instalação, o Arduino IDE leva alguns minutos para extrair as ferramentas após o download, por favor, seja paciente.
Gravando bootloader da Adafruit
Use o gravador SEGGER JLINK para gravar o BREAKOUT com módulo NINA B302, conecte nos pinos do SWCLK (pino 7) e SWDIO (pino 9) do SEGGER JLINK nos pinos SWDCLK e SWDIO do BREAKOUT (pinos nas laterais, próximo à antena). Não esquecer de ligar os GND do BREAKOUT no GND do SEGGER JTAG, bem como alimentar o BREAKOUT com 3.3V.
Ligue os pinos SWD DIO e CLK ...
...nestes pinos da placa BREAKOUT
Você pode também usar o ST-LINK V2
Abra J-FLASH lite e grave o bootloader da Adafruit
O mesmo se encontra em
....\packages\adafruit\hardware\nrf52\0.19.0\bootloader\feather_nrf52840_express
Compile depois para o NINA B302
https://github.com/adafruit/Adafruit_nRF52_Bootloader
Com ele, você poderá transferir programas via DFU USB. Maiores detalhes sobre este bootloader
https://learn.adafruit.com/introducing-the-adafruit-nrf52840-feather/update-bootloader
Segundo a documentação, se você pressionar o reset, o módulo aguardará por um certo tempo se há algo sendo enviado pelo Arduino, ou seja, o programa a ser gravado via DFU.
ATENÇÃO, o bootloader usa USB para gravação do NINA 302, OU SEJA, CRIA UMA COMM VIRTUAL, TAMBÉM PARA SER A SERIAL PADRÃO DO ARDUINO
INSTALE OS DRIVERS
https://github.com/adafruit/Adafruit_Windows_Drivers
Conecte na USB + e USB - um cabo USB, AGUARDE INSTALAR OS DRIVERS

Futuramente altere arquivo variant.cpp para que as GPIOS sejam os mesmos do NINA B302, atualmente estão para o ADAFRUIT FEATHER EXPRESS.
Copie
Criado pelo Autor
variant.h
viariant.cpp
ÓTIMA REFERENCIA PARA PINOS DO ARDUINO E PINOS (GPIOS) DO NINA B302
Consulte
Instalando LIBS no NINA B302
1) UIPEthernet
"
- To fix
UIPEthernet, just copy these following files into the UIPEthernet directory to overwrite the old files:
"
// For nRF52
#define ENC28J60_USE_SPILIB true
uint8_t ENC28J60ControlCS = 4; //ENC28J60_CONTROL_CS; IO1
2) Crie Sketch e preencha sua credenciais e SENRIC TOKENS
Mude as credenciais.
3) Código fonte
/****************************************************************************************************************************
nRF52_Ethernet_Switch.ino
For Adafruit nRF52 boards, running W5x00 or ENC28J60 Ethernet shield
Based on and modified from SinricPro libarary (https://github.com/sinricpro/)
to support other boards such as SAMD21, SAMD51, Adafruit's nRF52 boards, etc.
Built by Khoi Hoang https://github.com/khoih-prog/SinricPro_Generic
Licensed under MIT license
Version: 2.4.0
Copyright (c) 2019 Sinric. All rights reserved.
Licensed under Creative Commons Attribution-Share Alike (CC BY-SA)
This file is part of the Sinric Pro (https://github.com/sinricpro/)
Example for how to use SinricPro Switch device:
- setup a switch device
- handle request using callback (turn on/off builtin led indicating device power state)
- send event to sinricPro server (flash button is used to turn on/off device manually)
Version Modified By Date Comments
------- ----------- ---------- -----------
2.4.0 K Hoang 21/05/2020 Initial porting to support SAMD21, SAMD51 nRF52 boards, such as AdaFruit Itsy-Bitsy,
Feather, Gemma, Trinket, Hallowing Metro M0/M4, NRF52840 Feather, Itsy-Bitsy, STM32, etc.
*****************************************************************************************************************************/
#define ENC28J60_CONTROL_CS SS;
// Uncomment the following line to enable serial debug output
#define ENABLE_DEBUG true
#if ENABLE_DEBUG
#define DEBUG_PORT Serial
#define NODEBUG_WEBSOCKETS
#define NDEBUG
#endif
#define LOGWARN(x) if(ENABLE_DEBUG) { Serial.print("[SINRIC_PRO] "); Serial.println(x); }
#define LOGWARN1(x,y) if(ENABLE_DEBUG) { Serial.print("[SINRIC_PRO] "); Serial.print(x);\
Serial.print(" "); Serial.println(y); }
#if ( defined(NRF52840_FEATHER) || defined(NRF52832_FEATHER) || defined(NRF52_SERIES) || defined(ARDUINO_NRF52_ADAFRUIT) || \
defined(NRF52840_FEATHER_SENSE) || defined(NRF52840_ITSYBITSY) || defined(NRF52840_CIRCUITPLAY) || defined(NRF52840_CLUE) || \
defined(NRF52840_METRO) || defined(NRF52840_PCA10056) || defined(PARTICLE_XENON) | defined(NINA_B302_ublox) )
#if defined(WIFININA_USE_NRF52)
#undef ETHERNET_USE_NRF52
#endif
#define ETHERNET_USE_NRF52 true
#define WIFI_USE_NRF52 true
#define WEBSOCKETS_NETWORK_TYPE NETWORK_ENC28J60
#else
#error This code is intended to run only on the Adafruit nRF52 boards ! Please check your Tools->Board setting.
#endif
#if defined(NRF52840_FEATHER)
#define BOARD_TYPE "NRF52840_FEATHER"
#elif defined(NRF52832_FEATHER)
#define BOARD_TYPE "NRF52832_FEATHER"
#elif defined(NRF52840_FEATHER_SENSE)
#define BOARD_TYPE "NRF52840_FEATHER_SENSE"
#elif defined(NRF52840_ITSYBITSY)
#define BOARD_TYPE "NRF52840_ITSYBITSY"
#elif defined(NRF52840_CIRCUITPLAY)
#define BOARD_TYPE "NRF52840_CIRCUITPLAY"
#elif defined(NRF52840_CLUE)
#define BOARD_TYPE "NRF52840_CLUE"
#elif defined(NRF52840_METRO)
#define BOARD_TYPE "NRF52840_METRO"
#elif defined(NRF52840_PCA10056)
#define BOARD_TYPE "NRF52840_PCA10056"
#elif defined(PARTICLE_XENON)
#define BOARD_TYPE "PARTICLE_XENON"
#elif defined(NRF52840_FEATHER)
#define BOARD_TYPE "NRF52840_FEATHER"
#elif defined(NINA_B302_ublox)
#define BOARD_TYPE "NINA_B302_ublox"
#elif defined(ARDUINO_NRF52_ADAFRUIT)
#define BOARD_TYPE "ARDUINO_NRF52_ADAFRUIT"
#elif defined(NRF52_SERIES)
#define BOARD_TYPE "NRF52_SERIES"
#else
#define BOARD_TYPE "NRF52_UNKNOWN"
#endif
// Use true for ENC28J60 and UIPEthernet library (https://github.com/UIPEthernet/UIPEthernet)
// Use false for W5x00 and Ethernetx library (https://www.arduino.cc/en/Reference/Ethernet)
#define USE_UIP_ETHERNET true
//#define USE_UIP_ETHERNET false
//#define USE_CUSTOM_ETHERNET true
// Note: To rename ESP628266 Ethernet lib files to Ethernet_ESP8266.h and Ethernet_ESP8266.cpp
// In order to USE_ETHERNET_ESP8266
#if ( !defined(USE_UIP_ETHERNET) || !USE_UIP_ETHERNET )
// To override the default CS/SS pin. Don't use unless you know exactly which pin to use
//#define USE_THIS_SS_PIN 27//22 //21 //5 //4 //2 //15
// Only one if the following to be true
#define USE_ETHERNET2 false //true
#define USE_ETHERNET3 false //true
#define USE_ETHERNET_LARGE false //true
#define USE_ETHERNET_ESP8266 false //true
#if ( USE_ETHERNET2 || USE_ETHERNET3 || USE_ETHERNET_LARGE || USE_ETHERNET_ESP8266 )
#ifdef USE_CUSTOM_ETHERNET
#undef USE_CUSTOM_ETHERNET
#endif
#define USE_CUSTOM_ETHERNET true
#endif
#if USE_ETHERNET3
#include "Ethernet3.h"
#warning Use Ethernet3 lib
#elif USE_ETHERNET2
#include "Ethernet2.h"
#warning Use Ethernet2 lib
#elif USE_ETHERNET_LARGE
#include "EthernetLarge.h"
#warning Use EthernetLarge lib
#elif USE_ETHERNET_ESP8266
#include "Ethernet_ESP8266.h"
#warning Use Ethernet_ESP8266 lib
#elif USE_CUSTOM_ETHERNET
#include "Ethernet_XYZ.h"
#warning Use Custom Ethernet library from EthernetWrapper. You must include a library here or error.
#else
#define USE_ETHERNET true
#include "Ethernet.h"
#warning Use Ethernet lib
#endif
// Ethernet_Shield_W5200, EtherCard, EtherSia not supported
// Select just 1 of the following #include if uncomment #define USE_CUSTOM_ETHERNET
// Otherwise, standard Ethernet library will be used for W5x00
#endif //#if !USE_UIP_ETHERNET
// Enter a MAC address and IP address for your controller below.
#define NUMBER_OF_MAC 20
byte mac[][NUMBER_OF_MAC] =
{
{ 0xDE, 0xAD, 0xBE, 0xEF, 0xFE, 0x01 },
{ 0xDE, 0xAD, 0xBE, 0xEF, 0xBE, 0x02 },
{ 0xDE, 0xAD, 0xBE, 0xEF, 0xFE, 0x03 },
{ 0xDE, 0xAD, 0xBE, 0xEF, 0xBE, 0x04 },
{ 0xDE, 0xAD, 0xBE, 0xEF, 0xFE, 0x05 },
{ 0xDE, 0xAD, 0xBE, 0xEF, 0xBE, 0x06 },
{ 0xDE, 0xAD, 0xBE, 0xEF, 0xFE, 0x07 },
{ 0xDE, 0xAD, 0xBE, 0xEF, 0xBE, 0x08 },
{ 0xDE, 0xAD, 0xBE, 0xEF, 0xFE, 0x09 },
{ 0xDE, 0xAD, 0xBE, 0xEF, 0xBE, 0x0A },
{ 0xDE, 0xAD, 0xBE, 0xEF, 0xFE, 0x0B },
{ 0xDE, 0xAD, 0xBE, 0xEF, 0xBE, 0x0C },
{ 0xDE, 0xAD, 0xBE, 0xEF, 0xFE, 0x0D },
{ 0xDE, 0xAD, 0xBE, 0xEF, 0xBE, 0x0E },
{ 0xDE, 0xAD, 0xBE, 0xEF, 0xFE, 0x0F },
{ 0xDE, 0xAD, 0xBE, 0xEF, 0xBE, 0x10 },
{ 0xDE, 0xAD, 0xBE, 0xEF, 0xFE, 0x11 },
{ 0xDE, 0xAD, 0xBE, 0xEF, 0xBE, 0x12 },
{ 0xDE, 0xAD, 0xBE, 0xEF, 0xFE, 0x13 },
{ 0xDE, 0xAD, 0xBE, 0xEF, 0xBE, 0x14 },
};
// Select the IP address according to your local network
// IPAddress ip(192, 168, 2, 222);
#include <WebSockets_Generic.h>
#include "SinricPro_Generic.h"
#include "SinricProSwitch.h"
#if 1
#define APP_KEY "xxxxxxxxxxx-55cb-4c1b-8062-824b8731eb95"
#define APP_SECRET "xxxxxxxxxxx-8a15-4072-8f51-6c13cec73395-9b0b1632-9284-4611-bae4-085b094d56ea"
#define SWITCH_ID "5ec5xxxxxxxxxxx4787e43703" // Office Lamp
#else
#define WIFI_SSID "YOUR-WIFI-SSID"
#define WIFI_PASS "YOUR-WIFI-PASSWORD"
#define APP_KEY "YOUR-APP-KEY" // Should look like "de0bxxxx-1x3x-4x3x-ax2x-5dabxxxxxxxx"
#define APP_SECRET "YOUR-APP-SECRET" // Should look like "5f36xxxx-x3x7-4x3x-xexe-e86724a9xxxx-4c4axxxx-3x3x-x5xe-x9x3-333d65xxxxxx"
#define SWITCH_ID "YOUR-DEVICE-ID" // Should look like "5dc1564130xxxxxxxxxxxxxx"
#endif
#define BAUD_RATE 115200 // Change baudrate to your need
#define BUTTON_PIN 0 // GPIO for BUTTON (inverted: LOW = pressed, HIGH = released)
#define LED_PIN 2 // GPIO for LED (inverted)
bool myPowerState = false;
unsigned long lastBtnPress = 0;
/* bool onPowerState(String deviceId, bool &state)
Callback for setPowerState request
parameters
String deviceId (r)
contains deviceId (useful if this callback used by multiple devices)
bool &state (r/w)
contains the requested state (true:on / false:off)
must return the new state
return
true if request should be marked as handled correctly / false if not
*/
bool onPowerState(const String &deviceId, bool &state)
{
//Serial.printf("Device %s turned %s (via SinricPro) \r\n", deviceId.c_str(), state ? "on" : "off");
Serial.print("Device ");
Serial.print(deviceId.c_str());
Serial.print(state ? " turned on" : " turn off");
Serial.println(" (via SinricPro)");
myPowerState = state;
digitalWrite(LED_PIN, myPowerState ? LOW : HIGH);
return true; // request handled properly
}
void handleButtonPress()
{
unsigned long actualMillis = millis(); // get actual millis() and keep it in variable actualMillis
if (digitalRead(BUTTON_PIN) == LOW && actualMillis - lastBtnPress > 1000)
{
// is button pressed (inverted logic! button pressed = LOW) and debounced?
if (myPowerState)
{
// flip myPowerState: if it was true, set it to false, vice versa
myPowerState = false;
}
else
{
myPowerState = true;
}
digitalWrite(LED_PIN, myPowerState ? LOW : HIGH); // if myPowerState indicates device turned on: turn on led (builtin led uses inverted logic: LOW = LED ON / HIGH = LED OFF)
// get Switch device back
SinricProSwitch& mySwitch = SinricPro[SWITCH_ID];
// send powerstate event
mySwitch.sendPowerStateEvent(myPowerState); // send the new powerState to SinricPro server
//Serial.printf("Device %s turned %s (manually via flashbutton)\r\n", mySwitch.getDeviceId(), myPowerState ? "on" : "off");
Serial.print("Device ");
Serial.print(mySwitch.getDeviceId());
Serial.print(myPowerState ? "turned on" : "turn off");
Serial.println(" (manually via flashbutton)");
lastBtnPress = actualMillis; // update last button press variable
}
}
// setup function for setupEthernet connection
void setupEthernet()
{
#if USE_ETHERNET
LOGWARN(F("=========== USE_ETHERNET ==========="));
#elif USE_ETHERNET2
LOGWARN(F("=========== USE_ETHERNET2 ==========="));
#elif USE_ETHERNET3
LOGWARN(F("=========== USE_ETHERNET3 ==========="));
#elif USE_ETHERNET_LARGE
LOGWARN(F("=========== USE_ETHERNET_LARGE ==========="));
#elif USE_ETHERNET_ESP8266
LOGWARN(F("=========== USE_ETHERNET_ESP8266 ==========="));
#else
LOGWARN(F("========================="));
#endif
LOGWARN(F("Default SPI pinout:"));
LOGWARN1(F("MOSI:"), MOSI);
LOGWARN1(F("MISO:"), MISO);
LOGWARN1(F("SCK:"), SCK);
LOGWARN1(F("SS:"), SS);
LOGWARN(F("========================="));
// unknown board, do nothing, use default SS = 10
#ifndef USE_THIS_SS_PIN
#define USE_THIS_SS_PIN 10 // For other boards
#endif
LOGWARN1(F("Use default CS/SS pin : "), USE_THIS_SS_PIN);
// For other boards, to change if necessary
#if ( USE_ETHERNET || USE_ETHERNET_LARGE || USE_ETHERNET2 )
// Must use library patch for Ethernet, Ethernet2, EthernetLarge libraries
Ethernet.init (USE_THIS_SS_PIN);
#elif USE_ETHERNET3
// Use MAX_SOCK_NUM = 4 for 4K, 2 for 8K, 1 for 16K RX/TX buffer
#ifndef ETHERNET3_MAX_SOCK_NUM
#define ETHERNET3_MAX_SOCK_NUM 4
#endif
Ethernet.setCsPin (USE_THIS_SS_PIN);
Ethernet.init (ETHERNET3_MAX_SOCK_NUM);
#endif //( USE_ETHERNET || USE_ETHERNET2 || USE_ETHERNET3 || USE_ETHERNET_LARGE )
// start the ethernet connection and the server:
// Use Static IP
//Ethernet.begin(mac, ip);
// Use DHCP dynamic IP and random mac
srand(millis());
uint16_t index = rand() % NUMBER_OF_MAC;
Serial.print("Index = ");
Serial.println(index);
Ethernet.begin(mac[index]);
Serial.print("Connected!\n[Ethernet]: IP-Address is ");
Serial.println(Ethernet.localIP());
}
// setup function for SinricPro
void setupSinricPro()
{
// add device to SinricPro
SinricProSwitch& mySwitch = SinricPro[SWITCH_ID];
// set callback function to device
mySwitch.onPowerState(onPowerState);
// setup SinricPro
SinricPro.onConnected([]()
{
//Serial.printf("Connected to SinricPro\r\n");
Serial.println("Connected to SinricPro");
});
SinricPro.onDisconnected([]()
{
//Serial.printf("Disconnected from SinricPro\r\n");
Serial.println("Disconnected from SinricPro");
});
SinricPro.begin(APP_KEY, APP_SECRET);
}
// main setup function
void setup()
{
pinMode(BUTTON_PIN, INPUT_PULLUP); // GPIO 0 as input, pulled high
pinMode(LED_PIN, OUTPUT); // define LED GPIO as output
digitalWrite(LED_PIN, HIGH); // turn off LED on bootup
Serial.begin(BAUD_RATE);
while (!Serial);
#if defined(BOARD_TYPE)
Serial.println("\nStarting nRF52_Ethernet_Switch on " + String(BOARD_TYPE));
#else
Serial.println("\nStarting nRF52_Ethernet_Switch on unknown nRF52 board");
#endif
setupEthernet();
setupSinricPro();
}
void loop()
{
handleButtonPress();
SinricPro.handle();
}
4) Compile e grave
6) Ligue o ENC28J60 no B302 conforme esquemas abaixo
static const uint8_t SS = (4);----> CS (ENC28J60)
static const uint8_t MOSI = PIN_SPI_MOSI; ----> SI (ENC28J60)
static const uint8_t MISO = PIN_SPI_MISO;----> SO (ENC28J60)
static const uint8_t SCK = PIN_SPI_SCK;----> SCK (ENC28J60)
#define PIN_SPI_SS (4)
#define PIN_SPI_MISO (24) //24 original IO8
#define PIN_SPI_MOSI (25) //25 original IO3
#define PIN_SPI_SCK (26) //26 original IO45
// D24 .. D26 (aka SPI pins)
32, // D24 is P1.00 (SPI MISO)
15, // D25 is P0.15 (SPI MOSI)
7, // D26 is P0.07 (SPI SCK )
14, // D10 is P0.14
6) Executando aplicação no NINA B302
8) Executando Aplicação no ALEXA APP (SKILL SINRIC PRO)
Etapa 1: criar uma conta do Sinric Pro
Visite http://portal.sinric.pro/register e inscreva-se para uma nova conta
Etapa 2: vincular sua conta Amazon Alexa
2.1 Abra seu aplicativo Amazon Alexa.
2.2 Vá para Habilidades e Jogos.
2.3 Procure o Sinric Pro.
2.4 Clique em ATIVAR PARA USAR.
2.5 Digite as credenciais que você criou na etapa 1.
Etapa 3: criar um novo dispositivo: campainha
3.1 Faça login na sua conta Sinric Pro.
3.2 Vá para o menu Dispositivos à sua esquerda.
3.3 Clique no botão Adicionar dispositivo (no canto superior esquerdo).
3.4 Digite o nome do dispositivo campainha, descrição smart doorbell e selecione o tipo como Campainha.
3.5 Selecione Chave de acesso ao dispositivo (padrão) e Sala (Sala de estar).
3.6 Clique em Salvar para criar o dispositivo
Sinric Pro criar dispositivo alexa
Depois de clicar no botão Salvar, o Amazon Alexa detectará automaticamente o dispositivo que acabamos de criar (se você concluiu a Etapa 2). Você verá uma notificação por push como abaixo no seu telefone.
Notificação Sinric Pro alexa campainha
Se você não recebeu a notificação por push, basta solicitar ao Alexa dispositivos do dispositivo
Questoes: suporte@smartcore.com.br
Sobre a SMARTCORE
A SmartCore fornece módulos para comunicação wireless, biometria, conectividade, rastreamento e automação.
Nosso portifólio inclui
modem 2G/3G/4G/NB-IoT/Cat.M, satelital, módulos WiFi, Bluetooth, GNSS /
GPS, Sigfox, LoRa, leitor de cartão, leitor QR code, mecanismo de
impressão, mini-board PC, antena, pigtail, LCD, bateria, repetidor GPS e
sensores.


Nenhum comentário:
Postar um comentário