U-BLOX NINA B302 E ETHERNET 802.3 (BLYNK) COM ALEXA
MÉTODO RÁPIDO VIA SINRIC
O objetivo deste BLOG é demonstrar como é possível utilizar o ARDUINO para programar o módulo U-BLOX NINA B302 para ter acesso a INTERNET via 802.3, por meio do módulo ENC28J60. Foi utilizado o BREAKOUT NINA B302 para o teste. Uma vez conectado na Internet, poderá receber comandos enviados pelo ASSISTENTE ALEXA!
Turn On Device e Turn Off Devices são uma das palavras chaves para a assistente Alexa. Ao falar estes comandos um Relê será Ligado e Desligado e uma mensagem ao APP BLYNK também será enviado.
SMARTCORE
A SmartCore fornece módulos para comunição wireless, biometria, conectividade, rastreamento e automação.
Nosso portifólio inclui modem 2G/3G/4G/NB-IoT/Cat.M, satelital, módulos WiFi, Bluetooth, GNSS / GPS, Sigfox, LoRa, leitor de cartão, leitor QR code, mecanismo de impressão, mini-board PC, antena, pigtail, LCD, bateria, repetidor GPS e sensores.
Mais detalhes em www.smartcore.com.br
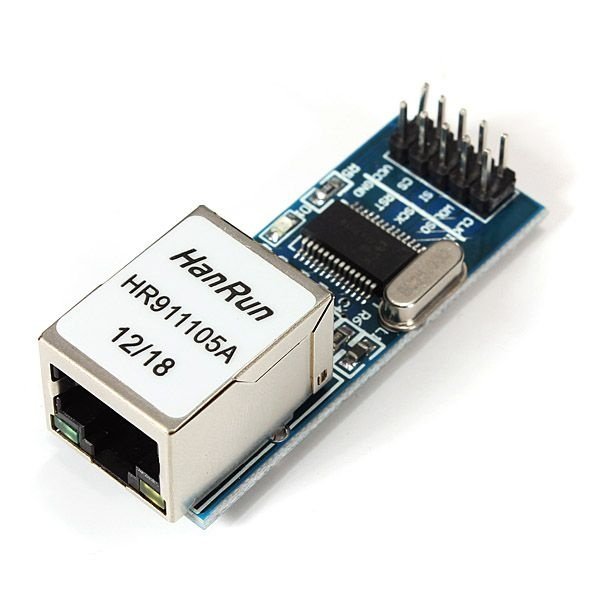
ENC28J60
O módulo Ethernet ENC28J60 utiliza o novo IC controlador controlador independente Microchip ENC28J60 com uma série de recursos para lidar com a maioria dos requisitos de protocolo de rede. A placa se conecta diretamente à maioria dos microcontroladores com uma interface SPI padrão com uma velocidade de transferência de até 20MHz.
SINRIC
 |
| Utilizado também também para testar o EndDevice |
Com Sinric, você pode conectar sua placa de desenvolvimento IOT com a Alexa através de uma Skill confiável
Vamos começar:
1. Acesse https://sinric.com/
2. Crie uma conta gratuita e faça log in
3. Pelo aplicativo da Alexa, ou pelo site, instale e ative a skill "Sinric"
4. Crie um novo dispositivo, como por exemplo uma TV. Anote o token de autorização, a chave de autenticação e o ID de se novo dispositivo.
5. O aplicativo da Alexa irá mostrar uma notificação informando que encontrou um novo dispositivo.
7. Carrego o exemplo abaixo em seu sketch
Altere o token, chave de autenticação e dados do WiFI com os seus próprios.
ASSISTENTE ALEXA
O Amazon Alexa é um serviço de voz na
nuvem da Amazon que permite que os desenvolvedores controlem por voz os
serviços da Amazon conectados. Um aplicativo exemplo é o Amazon Echo, que é um
assistente de controle de voz. Quando os usuários falam com o Amazon Echo, ele
analisa a voz recebida e faz uma resposta apropriada. Neste exemplo,
apresenta-se como conectar os serviços da Amazon (incluindo o Amazon Alexa, o
AWS Lambda, o AWS IoT Core, o AWS IAM).
O Amazon Alexa Skills Kit (ASK) é um
serviço de voz. Ele pode ser conectado a serviços da nuvem e o usuário pode
controlar por voz os serviços conectados e receber resposta de voz. O recurso
de análise de voz fornecido pelo Amazon Alexa está pronto para uso, faz com que
os desenvolvedores possam se concentrar no design do serviço em nuvem e no
modelo de interação do usuário.
Instalando Arduino Adafruit no NINA B302
Abaixo o roteiro para você seguir:
Baixe e instale o Arduino IDE
Inicie o Arduino IDE, vá em Preferências e adicione
https://www.adafruit.com/package_adafruit_index.json
como "URL adicional do gerenciador de pastas"
Abra o Boards Manager no menu Tools -> Board e instale o "Adafruit nRF52 by Adafruit"
Selecione sua placa nRF5 no menu Ferramentas -> Placa
Adafruit Bluefruit nRF52 Feather
OBSERVAÇÃO: Durante a instalação, o Arduino IDE leva alguns minutos para extrair as ferramentas após o download, por favor, seja paciente.
Gravando bootloader da Adafruit
Use o gravador SEGGER JLINK para gravar o BREAKOUT com módulo NINA B302, conecte nos pinos do SWCLK (pino 7) e SWDIO (pino 9) do SEGGER JLINK nos pinos SWDCLK e SWDIO do BREAKOUT (pinos nas laterais, próximo à antena). Não esquecer de ligar os GND do BREAKOUT no GND do SEGGER JTAG, bem como alimentar o BREAKOUT com 3.3V.
Ligue os pinos SWD DIO e CLK ...
...nestes pinos da placa BREAKOUT
Você pode também usar o ST-LINK V2
Abra J-FLASH lite e grave o bootloader da Adafruit
O mesmo se encontra em
....\packages\adafruit\hardware\nrf52\0.19.0\bootloader\feather_nrf52840_express
Compile depois para o NINA B302
https://github.com/adafruit/Adafruit_nRF52_Bootloader
Com ele, você poderá transferir programas via DFU USB. Maiores detalhes sobre este bootloader
https://learn.adafruit.com/introducing-the-adafruit-nrf52840-feather/update-bootloader
Segundo a documentação, se você pressionar o reset, o módulo aguardará por um certo tempo se há algo sendo enviado pelo Arduino, ou seja, o programa a ser gravado via DFU.
ATENÇÃO, o bootloader usa USB para gravação do NINA 302, OU SEJA, CRIA UMA COMM VIRTUAL, TAMBÉM PARA SER A SERIAL PADRÃO DO ARDUINO
INSTALE OS DRIVERS
https://github.com/adafruit/Adafruit_Windows_Drivers
Conecte na USB + e USB - um cabo USB, AGUARDE INSTALAR OS DRIVERS

Futuramente altere arquivo variant.cpp para que as GPIOS sejam os mesmos do NINA B302, atualmente estão para o ADAFRUIT FEATHER EXPRESS.
Copie
Criado pelo Autor
variant.h
viariant.cpp
ÓTIMA REFERENCIA PARA PINOS DO ARDUINO E PINOS (GPIOS) DO NINA B302
Consulte
Instalando LIBS no NINA B302
1) UIPEthernet
Ver LINK
"
- To fix
UIPEthernet, just copy these following files into the UIPEthernet directory to overwrite the old files:
"
Em
Enc28J60Network.cpp adicione
void Enc28J60Network::init(uint8_t* macaddr)
{
Serial.print("ENC28J60_CONTROL_CS =");
Serial.println(ENC28J60_CONTROL_CS);
Serial.print("SS =");
Serial.println(SS);
Serial.print("SPI_MOSI =");
Serial.println(SPI_MOSI);
Serial.print("SPI_MISO =");
Serial.println(SPI_MISO);
Serial.print("SPI_SCK =");
Serial.println(SPI_SCK);
e
// For nRF52
#define ENC28J60_USE_SPILIB true
uint8_t ENC28J60ControlCS = 10; //ENC28J60_CONTROL_CS;
2) WEBSOCKETS
Veja o README
3) Abra o exemplo NRF52_BLYNK_ENC_ALEXA.INO
Mude as credenciais.
4) Código fonte
/****************************************************************************************************************************
nRF52_Blynk_ENC_Alexa.ino
For nRF52 using ENC28J60 Shield/Module
BlynkEthernet_WM is a library for Teensy, ESP, SAM DUE and SAMD boards, with Ethernet W5X00 or ENC28J60 shields,
to enable easy configuration/reconfiguration and autoconnect/autoreconnect of Ethernet/Blynk
AVR Mega and W5100 is not supported.
Library modified from Blynk library v0.6.1 https://github.com/blynkkk/blynk-library/releases
Built by Khoi Hoang https://github.com/khoih-prog/BlynkEthernet_WM
Licensed under MIT license
Version: 1.0.16
Based on and modified from WebSockets libarary https://github.com/Links2004/arduinoWebSockets
to support other boards such as SAMD21, SAMD51, Adafruit's nRF52 boards, etc.
Built by Khoi Hoang https://github.com/khoih-prog/WebSockets_Generic
Licensed under MIT license
Version: 2.1.3
Created on: 24.05.2015
Author: Markus Sattler
Version Modified By Date Comments
------- ----------- ---------- -----------
2.1.3 K Hoang 15/05/2020 Initial porting to support SAMD21, SAMD51, nRF52 boards, such as AdaFruit Feather nRF52832,
nRF52840 Express, BlueFruit Sense, Itsy-Bitsy nRF52840 Express, Metro nRF52840 Express, etc.
*****************************************************************************************************************************/
#include "defines.h"
#include "Credentials.h"
#include "dynamicParams.h"
#define DEBUG_SETUP 2
//Last device status, to minimize reporting / updating traffic
//Only report / update when current status != last satus
bool lastDevice_01_ON;
#define RELAY_PIN_1 5
#include <WebSocketsClient_Generic.h> // get it from https://github.com/khoih-prog/WebSockets_Generic
#include <ArduinoJson.h> // get it from https://arduinojson.org/ or install via Arduino library manager
WebSocketsClient webSocket;
uint64_t heartbeatTimestamp = 0;
bool isConnected = false;
void setPowerStateOnServer(String deviceId, String value);
//To increase no of devices as needed
void turnOn(String deviceId)
{
if (deviceId == SINRIC_Device_ID_1) // Device ID of 1st device
{
#if (DEBUG_SETUP > 1)
Serial.print("Turn on device id: ");
Serial.println(deviceId);
#endif
digitalWrite(RELAY_PIN_1, HIGH);
}
else
{
#if (DEBUG_SETUP > 1)
Serial.print("Turn on for unknown device id: ");
Serial.println(deviceId);
#endif
}
}
//To increase no of devices as needed
void turnOff(String deviceId)
{
if (deviceId == SINRIC_Device_ID_1) // Device ID of 1st device
{
#if (DEBUG_SETUP > 1)
Serial.print("Turn off Device ID: ");
Serial.println(deviceId);
#endif
digitalWrite(RELAY_PIN_1, LOW);
}
else
{
#if (DEBUG_SETUP > 1)
Serial.print("Turn off for unknown device id: ");
Serial.println(deviceId);
#endif
}
}
void webSocketEvent(WStype_t type, uint8_t * payload, size_t length)
{
switch (type)
{
case WStype_DISCONNECTED:
isConnected = false;
#if (DEBUG_SETUP > 0)
Serial.printf("[WSc] Webservice disconnected from sinric.com!\n");
#endif
break;
case WStype_CONNECTED:
{
isConnected = true;
#if (DEBUG_SETUP > 0)
Serial.printf("[WSc] Service connected to sinric.com at url: %s\n", payload);
Serial.printf("Waiting for commands from sinric.com ...\n");
#endif
}
break;
case WStype_TEXT:
{
#if (DEBUG_SETUP > 1)
Serial.printf("[WSc] get text: %s\n", payload);
#endif
// Example payloads
// For Switch or Light device types
// {"deviceId": xxxx, "action": "setPowerState", value: "ON"} // https://developer.amazon.com/docs/device-apis/alexa-powercontroller.html
// For Light device type
// Look at the light example in github
#if (ARDUINOJSON_VERSION_MAJOR >= 6)
DynamicJsonDocument json(1024);
auto deserializeError = deserializeJson(json, (char*)payload);
if ( deserializeError )
{
Serial.println("JSON parseObject() failed");
return;
}
//serializeJson(json, Serial);
#else
DynamicJsonBuffer jsonBuffer;
// Parse JSON string
JsonObject& json = jsonBuffer.parseObject((char*)payload);
// Test if parsing succeeds.
if (!json.success())
{
Serial.println("JSON parseObject() failed");
return;
}
#endif
String deviceId = json ["deviceId"];
String action = json ["action"];
if (action == "setPowerState")
{
// Switch or Light
String value = json ["value"];
if (value == "ON")
{
turnOn(deviceId);
}
else
{
turnOff(deviceId);
}
}
else if (action == "SetTargetTemperature")
{
String deviceId = json ["deviceId"];
String action = json ["action"];
String value = json ["value"];
}
else if (action == "test")
{
#if (DEBUG_SETUP > 1)
Serial.println("[WSc] received test command from sinric.com");
#endif
}
}
break;
case WStype_BIN:
#if (DEBUG_SETUP > 1)
Serial.printf("[WSc] get binary length: %u\n", length);
#endif
break;
}
}
// If you are going to use a push button to on/off the switch manually, use this function to update the status on the server
// so it will reflect on Alexa app.
// eg: setPowerStateOnServer("deviceid", "ON")
void setPowerStateOnServer(String deviceId, String value)
{
#if (ARDUINOJSON_VERSION_MAJOR >= 6)
DynamicJsonDocument root(1024);
#else
DynamicJsonBuffer jsonBuffer;
JsonObject& root = jsonBuffer.createObject();
#endif
root["deviceId"] = deviceId;
root["action"] = "setPowerState";
root["value"] = value;
//StreamString databuf;
String databuf;
#if (ARDUINOJSON_VERSION_MAJOR >= 6)
serializeJson(root, databuf);
#else
root.printTo(databuf);
#endif
webSocket.sendTXT(databuf);
}
// Create VirtualLEDs bound to Virtual Pins to reflect the status of PINs
WidgetLED LED_D1(V1);
#define BLYNK_STATUS_UPDATE_INTERVAL 2000 // in millisecs => 2 secs
BlynkTimer timer;
void updateBlynkStatus( void )
{
// Give Blynk the current status to display on user's Blynk screen
if (digitalRead(RELAY_PIN_1))
{
if (!lastDevice_01_ON)
{
LED_D1.on();
//Update for Alexa
setPowerStateOnServer(SINRIC_Device_ID_1, "ON");
}
lastDevice_01_ON = true;
}
else
{
if (lastDevice_01_ON)
{
LED_D1.off();
//Update for Alexa
setPowerStateOnServer(SINRIC_Device_ID_1, "OFF");
}
lastDevice_01_ON = false;
}
}
void myTimerEvent(void)
{
updateBlynkStatus();
}
void heartBeatPrint(void)
{
static int num = 1;
if (Blynk.connected())
Serial.print(F("B"));
else
Serial.print(F("F"));
if (num == 80)
{
Serial.println();
num = 1;
}
else if (num++ % 10 == 0)
{
Serial.print(F(" "));
}
}
void check_status()
{
static unsigned long checkstatus_timeout = 0;
#define STATUS_CHECK_INTERVAL 10000L
// Send status report every STATUS_REPORT_INTERVAL (60) seconds: we don't need to send updates frequently if there is no status change.
if ((millis() > checkstatus_timeout) || (checkstatus_timeout == 0))
{
heartBeatPrint();
checkstatus_timeout = millis() + STATUS_CHECK_INTERVAL;
}
}
void setup()
{
//Assuming all devices on, to be safe, we have to turn off all of them later by calling updateBlynkStatus()
//Call only after Blynk and Alexa / SINRIC already initialized
lastDevice_01_ON = true;
pinMode(RELAY_PIN_1, OUTPUT);
digitalWrite(RELAY_PIN_1, LOW);
// Debug console
Serial.begin(115200);
while (!Serial);
#if USE_BLYNK_WM
#if ( USE_LITTLEFS || USE_SPIFFS)
Serial.println("\nStart ENC28J60_Blynk using " + String(CurrentFileFS) + " on " + String(BOARD_TYPE));
#else
Serial.println("\nStart ENC28J60_Blynk on " + String(BOARD_TYPE));
#endif
Blynk.begin();
#else
#if USE_LOCAL_SERVER
Serial.println("\nStart ENC28J60_Blynk, no WM, on " + String(BOARD_TYPE) + String(" using Local Server"));
Blynk.begin(auth, server, BLYNK_HARDWARE_PORT);
#else
Serial.println("\nStart ENC28J60_Blynk, no WM, on " + String(BOARD_TYPE) + String(" using Cloud Server"));
//Blynk.begin(auth);
// You can also specify server:
Blynk.begin(auth, server, BLYNK_HARDWARE_PORT);
#endif
#endif
// Setup a function to be called every BLYNK_STATUS_UPDATE_INTERVAL/1000 seconds
timer.setInterval(BLYNK_STATUS_UPDATE_INTERVAL, myTimerEvent);
// server address, port and URL
//webSocket.begin("iot.sinric.com", 80, "/");
webSocket.begin(SINRIC_WEBSERVER, SINRIC_WEBSERVER_PORT, "/");
// event handler
webSocket.onEvent(webSocketEvent);
webSocket.setAuthorization("apikey", SINRIC_API_KEY);
// try again every SINRIC_WEBSOCKET_RETRY_TIME = 5000ms if connection has failed
// If you see 'class WebSocketsClient' has no member named 'setReconnectInterval' error update arduinoWebSockets
webSocket.setReconnectInterval(SINRIC_WEBSOCKET_RETRY_TIME /*5000*/);
//Call only after Blynk and Alexa / SINRIC already initialized
updateBlynkStatus();
}
#if (USE_BLYNK_WM && USE_DYNAMIC_PARAMETERS)
void displayCredentials(void)
{
Serial.println("\nYour stored Credentials :");
for (int i = 0; i < NUM_MENU_ITEMS; i++)
{
Serial.println(String(myMenuItems[i].displayName) + " = " + myMenuItems[i].pdata);
}
}
#endif
void loop()
{
Blynk.run();
timer.run();
check_status();
webSocket.loop();
if (isConnected)
{
uint64_t now = millis();
// Send heartbeat in order to avoid disconnections during ISP resetting IPs over night. Thanks @MacSass
if ((now - heartbeatTimestamp) > HEARTBEAT_INTERVAL)
{
heartbeatTimestamp = now;
webSocket.sendTXT("H");
}
}
#if (USE_BLYNK_WM && USE_DYNAMIC_PARAMETERS)
static bool displayedCredentials = false;
if (!displayedCredentials)
{
for (int i = 0; i < NUM_MENU_ITEMS; i++)
{
if (!strlen(myMenuItems[i].pdata))
{
break;
}
if ( i == (NUM_MENU_ITEMS - 1) )
{
displayedCredentials = true;
displayCredentials();
}
}
}
#endif
}
5) Compile e grave
6) Ligue o ENC28J60 no B302 conforme esquemas abaixo
static const uint8_t SS = (4);----> CS (ENC28J60)
static const uint8_t MOSI = PIN_SPI_MOSI; ----> SI (ENC28J60)
static const uint8_t MISO = PIN_SPI_MISO;----> SO (ENC28J60)
static const uint8_t SCK = PIN_SPI_SCK;----> SCK (ENC28J60)
#define PIN_SPI_MISO (24) //24 original IO8
#define PIN_SPI_MOSI (25) //25 original IO3
#define PIN_SPI_SCK (26) //26 original IO45
// D24 .. D26 (aka SPI pins)
32, // D24 is P1.00 (SPI MISO)
15, // D25 is P0.15 (SPI MOSI)
7, // D26 is P0.07 (SPI SCK )
14, // D10 is P0.14
7) Executando aplicação no NINA B302
8) Executando Aplicação no ALEXA APP (SKILL SINRIC)
Alexa SKILL
Comando de voz Liga / Desliga LED
WidgetLED LED_D1(V1);
Questões: suporte@smartcore.com.br
Sobre a SMARTCORE
A SmartCore fornece módulos para comunicação wireless, biometria, conectividade, rastreamento e automação.
Nosso portifólio inclui
modem 2G/3G/4G/NB-IoT/Cat.M, satelital, módulos WiFi, Bluetooth, GNSS /
GPS, Sigfox, LoRa, leitor de cartão, leitor QR code, mecanismo de
impressão, mini-board PC, antena, pigtail, LCD, bateria, repetidor GPS e
sensores.


Nenhum comentário:
Postar um comentário